Friday, July 3, 2009

Annual Maintenance

During the July 4th holiday week I changed the engine oil and filter. The old oil looked relatively clean (which is not surprising since the engine probably had less than 50 hours of use since the service last July). The new oil change tank with self-contained extraction pump worked great! It was quicker, easier, and less messy than using a separate hand pump and tank.

I inspected the engine, tightened bolts, checked the belt, and painted a few areas that were showing signs of rust. Fortunately, the engine starts easily and runs very well. Although I don't have an hour meter, the engine seems to have plenty of life left in it. I also checked the two batteries and topped them off with distilled water. I checked all of the holds and dried out any signs of moisture.

On July 11th I replaced the primary fuel filter. The fuel I drained in the filter bowl looked very clean with no signs of water or contamination. I replaced the filter with a Racor 30 micron R12P element and bled the air out of the primary and secondary bowls. A diesel loves clean fuel!


Here's a shot in the electrical panel. I recently updated some of the labels for accuracy.


I also added a Ritchie compass cover and a marine mount for our hand held Garmin GPS:

Tuesday, June 30, 2009

Early Summer Sailing

It's early summer and perfect sailing weather here in the Channel Islands. On Sunday, Dave and I took a day sail out to oil platform Gina and back. It was mostly overcast with the wind blowing from the west at 10-14 knots and swells of 2-4 feet. We sailed at 4-5 knots on the way out to Gina and 4-6 knots on the return leg. We saw many dolphins feeding and playing out by the fishing buoys. An Islander Freeport 36 was leaving the harbor as we were returning. We decided to come about and see if we could catch her. We followed the IF36 for about 30 minutes and kept up with her pretty well.

Today I did a similar day sail with Jon and his daughter Maddie. The conditions were similar as on Sunday with perhaps slightly heavier seas. After a quick overview of the boat we left the slip with Maddie at the helm. We saw a couple of sea lions, lots of pelicans, and the usual other sea birds. Being a pilot, Jon admired the pelicans flying in formation close to the water. We ate lunch after we tacked past Gina. Our return leg was fast and we actually hit 8 knots with the help of a following sea. It was a great day for a sail!


Julianne back in her slip after a washdown.


July 4th was a perfect sailing day! The sky was clear with winds blowing 10-14 knots from the W-NW. I went for a day sail with my riding buddy Bill and his wife Nancy. We had a great sail out past Gina on a course set for Frenchy's Cove on the West end of Anacapa Island. This was one of those perfect days where we could have sailed directly into Smugglers without tacking. We sailed at 4-5.5 knots on a close reach into the swells will Bill at the helm. We saw some dolphins feeding in their usual spot by the fishing bouys near Gina. The return trip was even faster at 5.5-6.5 knots.


The July 4th party on D dock was awesome as usual with lots of great food, drink, friends, and music. It was great catching up with everyone on the dock. I left before the fireworks display to return home and care for Max since he's so terrified by the fireworks. We watched Morning Light, the Disney movie about 11 young sailors competing in the TransPac. This was a great way to conclude my holiday week!

Tuesday, June 23, 2009

More Improvements

This mid-June weekend was very overcast with heavy winds and seas so I decided to make some more repairs and improvement to Julianne. My dock neighbor Tom helped me hoist a used 1.2 oz drifter sail that I picked up from Joe the painter. The sail came off Joe's 29' Ericson and was a bit larger than expected. It should work well for sailing more into the wind than down wind with less than 10 knots apparent. I can't wait to try it!

Tom then pointed out that the Aqua-Signal Series 25 bi-color bow light was heavily faded. Although the light worked fine, he shamed me into replacing it with a new one (dock peer pressure!). Since this was something that was suggested in our pre-purchase survey, I decided to go ahead and replace it. Of course, the old fasteners were seized, so I had to break off the old wire mounts. Lonny helped me strip the wires and connect them to the new fixture. The new light bolted on nicely and looks great. It should project better with the new clear lens and really dresses up the bow.

While looking for the Ullman Sails shop in Ventura (in case I need to modify the drifter), I discovered Beacon Marine Hardware. In addition to the bow light, they had some other parts and services that I have been looking for. For example, they have a person on-site that will make swage fittings for lifelines and rigging. They also had some replacement ladder latches that I think will work well for our cockpit ladder. It's nice to have an alternative to West Marine now that Boater's World went out of business. Since I now had a source for the lifelines, I decided to replace what I think are the old and rusty original equipment lifelines. I went back to the boat, removed the old lifelines, and dropped them off at Beacon for replacement. The new lifelines were ready a couple of days later and I installed them on Sat, June 27th. They turned out nice and were less expensive than I originally estimated. I may take one of the long upper lifelines back to have it shortened by a couple of inches.


I noticed that the Nicro Solar Day/Night vent I installed in January was no longer turning. I pulled it apart and verified that it wouldn't work under solar power without the battery. Since it had a two year warranty, I took it back to West Marine for a replacement. They told me that they've had problems with these and gave me a replacement which I installed the following weekend.

I also rigged a four foot length of 1/4" shock cord around the tiller with ends clipped to the stern pulpit stanchions on each side to act as a tiller dampener when the boat is docked. This will also come in handy for holding the tiller steady while under sail when I don't have the auto-tiller mounted. While in the cockpit I installed some drink holders and solar lights.


I look forward to enjoying these improvements next week during my Summer vacation!

Monday, May 18, 2009

Heaving To

We had a very lazy and relaxing day on the boat last Saturday, May 17th. My parents came down on their way home from a tour of the Central Coast with the Aston Martin Owners Club. We hung around the marina, showed them the boat, and had a chance to catch up. They used to do a lot of sailing on their Catalina 38 and Lancer 44 when they lived in Orange County. Our plan was to sail over to Anacapa Island, have some lunch, and do some fishing. However, there was very little wind and a heavy overcast. So, we did the next best thing and took a nap after my patents left!

Lonny was thinking of taking his Cal 25 named Irish Mist out for a sail and convinced us to take Julianne out for a comparison sail. After leaving the harbor, Lonny suggested we try to heave to. Although LeeAnne and I have been sailing for many years, and I've read about heaving to, I've never actually done it. We gave it a try by back winding the Genoa while going half way through a tack and then moving the tiller to leeward until the boat stopped. It actually worked remarkably well! We then brought the tiller to windward to complete a jibe and continue on our original tack. We tried this a couple of times and now feel comfortable doing so.


We then had a friendly race down the coast to the Port Hueneme buoy. We got off to a good start and pulled ahead of Lonny while we was setting up his "sheet to tiller" rig. The wind was shifting a bit and he actually sailed faster via his "automatic" sheet to tiller rig than he did manually. We encountered dozens of sea lions around the buoy. They seemed to be having a good time playing, relaxing, and feeding in large groups.

Sunday, April 19, 2009

Finally used the spinnaker!

Yesterday LeeAnne, Dean, and I made our second attempt at using our asymmetrical (cruising) spinnaker... only this time we remembered to bring the spinnaker sheets! It was a beautiful cloudless day with 8-10 knot winds from the west and 2-3 foot swells. We sailed out to about 1/2 mile west of oil platform Gina using the Genoa and main at 4-5 knots. We then tacked and headed back towards Channel Islands harbor on a close reach while I rigged the spinnaker. It took me longer than expected to rig the spinnaker since it had been almost 20 years since I had last done it. This was the first time that LeeAnne and Dean and helped crew with a spinnaker. Once everything was rigged, we altered our course towards Pt. Mugu on a broad reach with LeeAnne at the tiller, Dean tending the spinnaker sheet, and me shifting between hoisting the halyard and moving to the foredeck to observe and orchestrate.

Unfortunately, the sail twisted on itself during our first attempt at raising it. We lowered it down about 2/3 the way and I un-clipped the tack and unwrapped the twist. It was kind of like a one-man band with me simultaneously trying to hold the clew in one hand, the tack in the other, while unwrapping the twist and trying to keep the foot out of the water without falling overboard! I took the precaution of wearing my inflatable life vest and gave LeeAnne instructions on using the Lifesling just in case. I didn't use the safety harness or jack lines since I wanted to avoid getting tangled up. After freeing the twist we hoisted the halyard again. The sail immediately filled with air and the Julianne started to accelerate! The spinnaker, which I bought used on eBay, seemed to fit Julianne beautifully. The tack was just above the bow pulpit, the head raised to the top of the mast, the clew far enough out for a nice full sail. We forgot to bring a camera so LeeAnne took the pics below with her cellphone. The spinnaker looked better than I expected and we all enjoyed flying it! We sailed on a broad reach back towards the coast with smiles on our faces. All too soon we had to lower the sail... which was another challenge since we didn't have a dousing sock and the wind had picked up a bit. With good teamwork we were able to lower the sail without me or the sail going overboard. I'll re-pack the spinnaker at home and be more careful to aviod any twists! It was a great first experience and we hope we get to do it again soon.


Wednesday, April 15, 2009

Companionway Hatch Restoration

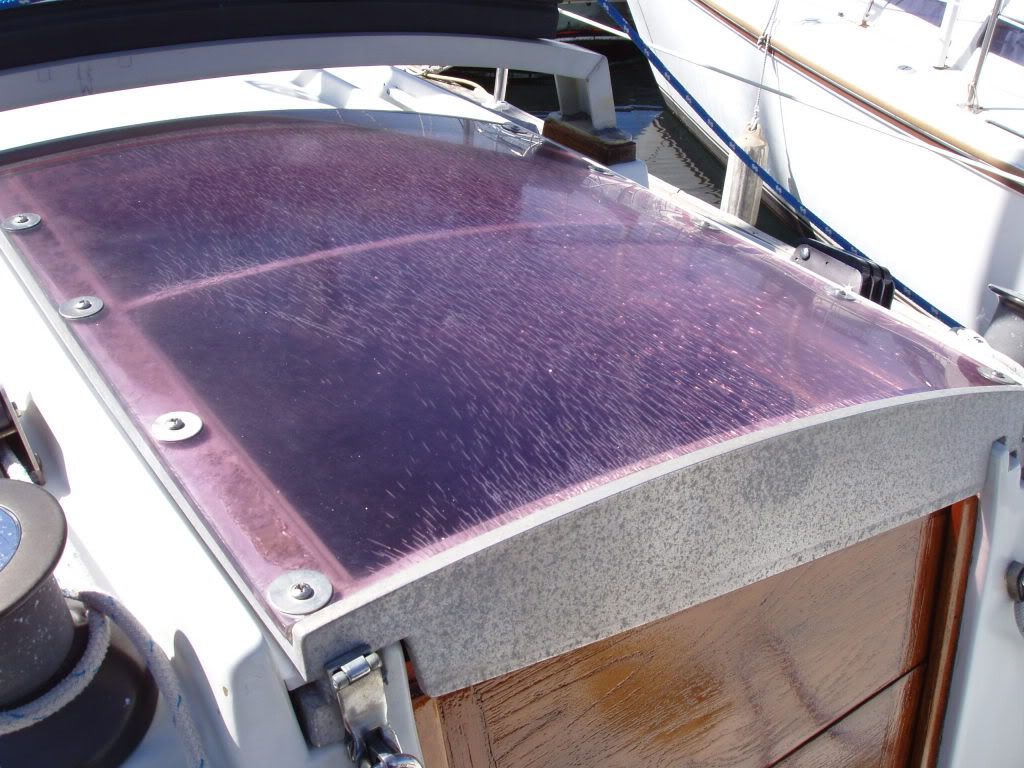
Julianne is really starting to shape up nicely. Everything is working well and most of the cosmetic items have been restored or replaced. I've been procrastinating restoring the companionway hatch cover because I feared that it would be expensive and take over a week to complete. Unfortunately, the companionway hatch is located in the center of the boat making it a very noticeable eyesore. After over 22 years of exposure to the sun and corrosive marine environment, the thick plastic window became crazed and the aluminum frame heavily oxidized. Here are some before pictures:

My plan was to remove the hatch from the boat, remove the SS screws, take the hatch frame to a polishing/plating shop for restoration (a smooth silver satin finish), and then get a new custom fit plastic window made at American Plastics in Camarillo. Unfortunately nine of the 12 SS screws were frozen solid in the frame which caused the heads to break off when we tried to remove them (we even tried heating them with a torch and tapping them with a hammer... but they were frozen solid!). I took the frame to Del's Machine Shop in Oxnard to get the broken studs removed. Brian did a great job of drilling out the old screws and inserting SS easy coils. He also put a satin finish on the front and rear surface of the hatch frame. I then took the frame to Atlas Plating down the road and asked them to clean and smooth out the frame surface and power coat it in a silver satin finish. Atlas had the frame for a week and completely botched the job!!! They didn't clean or smooth out the surface and applied a clear coat finish over the front and rear surface only... on top of the old corrosion and silicone sealant!!! We obviously had a communication problem.

Julia told me that her boyfriend Derek could help clean up the botched coating job. It turns out that the place I should have used was The Polishing Shop just down the street in Oxnard. They do quality work and understand English. The guy at the Polishing Shop told me that he had just finished a similar sailboat hatch job the prior week.

A couple of weeks later, I picked up the frame from The Polishing Shop. They used a special media blast to clean-up the remaining corrosion, sealant, and clear coat. They then used a Scotch Brite pad to provide a uniform satin finish. An finally, they applied a hot ceramic coating and baked it in the oven. It turned out great and should continue to look nice for many years!


I then took the newly restored frame and original plastic sheet to American Plastics in Camarillo. I was told that the original sheet was 3/8" thick acrylic plastic. Unfortunately, the guy at the shop said that they couldn't do the job!!! He said that the thick acrylic plastic would crack if we tried to make it fit the arc of the hatch. He said that I'd have to have the plastic drape formed in an oven and recommended I try California Quality Plastics in Ontario. A few days later I got a quote from Cal Quality Plastics. They wanted $629 to make a drape formed piece. They said that they couldn't use my frame and they'd have to create a special tool to form the sheet. Since I already has overspent my budget for this project, I told them no thanks. I went back to American Plastics and asked about other options. The guy reiterated that a 3/8" piece of acrylic would crack. I asked about using a thinner, more flexible sheet. He suggested that I use polycarbonate if I wanted a thinner, more flexible piece. The polycarbonate is stronger, but will not hold up as well in the sunlight. I figured that polycarbonate would be OK since the plastic is covered when the boat is not in use.

We then noticed that the frame and original plastic sheet were not square. American Plastics could only make straight cuts so we used the shortest dimensions. They cut a piece of 1/4" thick gray tinted Makrolon polycarbonate. I bought a couple of special plastic drill bits and brought the new sheet home to do the final prep. I drilled the holes using the old sheet as a template. The holes all lined up great. I spent several hours with a sanding block trying to make the new sheet's edges line up with the frame.

I had to purchase new sets of bolts since the previous bolts I purchased did not fit with the thinner plastic. I then brought everything down to the boat and spent about five hours putting it back together. I used stainless steel anti-seize on all of the threads to prevent galling or galvanic corrosion. I also applied a thin bead of clear silicone sealant on the frame to seal and provide some cushioning between the aluminum frame and plastic sheet. I used neoprene washers between the plastic and the fender washers to absorb some of the stress from the bolts. While I was at it, I installed a grab handle and a new SS lock hasp.

Although this project was far more complicated, time consuming, and expensive than I anticipate, I think it turned out nicely and like how it dresses up the cockpit. Click the pics below for a closeup. What a difference!

A short daysail in March

After several weekends of bad weather, LeeAnne, Dean and I went on a short day sail up the coast in late March. We had a very slight breeze and planned to try using our cruising spinnaker for the first time. Unfortunately, we forgot to bring the spinnaker sheets so we just sailed up the coast and back with the main sail & Genoa.